

The most expensive electrical variation on any build is the one you request the day after the gyprock goes up. Designing a comprehensive electrical plan should feel exciting, yet deciphering technical symbols and architectural schematics often brings unwanted stress. It's completely natural to second-guess your layout, worry about missing vital power points, or wonder whether your switchboard can handle modern induction cooking and heavy air conditioning loads.
You shouldn't need a trade licence to get your home's wiring right. A great plan simply maps your daily living habits and energy demands before framing starts. This guide gives you the clarity to take control, avoid messy post-plaster retrofits, and walk through your on-site rough-in with complete confidence.
Here is your complete, room-by-room checklist covering general power, architectural lighting, ventilation, and future-proof additions like solar, battery storage, and EV charging.
Key Takeaways
- Locking in a comprehensive electrical plan before gyprock installation prevents expensive structural changes, messy patch jobs, and costly variations down the track.
- Mapping functional mounting heights and dedicated circuits room by room keeps living zones, bedrooms, and home offices completely free from extension lead clutter.
- Complying with Australian bathroom safety zones and outdoor IP weatherproof ratings guarantees your wet areas and alfresco spaces remain safe and fully certified.
- Auditing your switchboard early ensures your infrastructure can support heavy induction loads, solar panels, battery storage, and EV charger additions without bottlenecking power.
- Walking the bare timber framing with your licensed electrician during rough-in allows you to verify physical switch heights, door swings, and lighting drops before insulation seals the walls.
What Is an Electrical Plan & Why Is It Crucial for Renos?
An electrical plan is a dedicated technical drawing that maps every light fixture, switch, General Purpose Outlet (GPO), and hardwired appliance across your architectural floor layout. More than just interior decoration, this document translates your daily living habits into trade-compliant instructions that satisfy AS/NZS 3000 Wiring Rules. Clear plans eliminate guesswork between your builder, carpenter, and electrician, keeping everyone aligned before rough-in begins.
Without an early layout, renovations hit snags fast. Waiting until the walls are framed to decide where appliances go leads to compromised wiring routes, cluttered switch plates, and costly project hold-ups. Integrating comprehensive planning with experienced residential electrical services gives Gold Coast homeowners complete control over their layout long before tools touch the timber framing.
Blueprints vs Reality: Decoding Standard Australian Electrical Symbols
Architectural schematics look like a foreign language until you understand the core symbols. Getting familiar with standard Australian notations ensures you get fixtures where you actually want them:
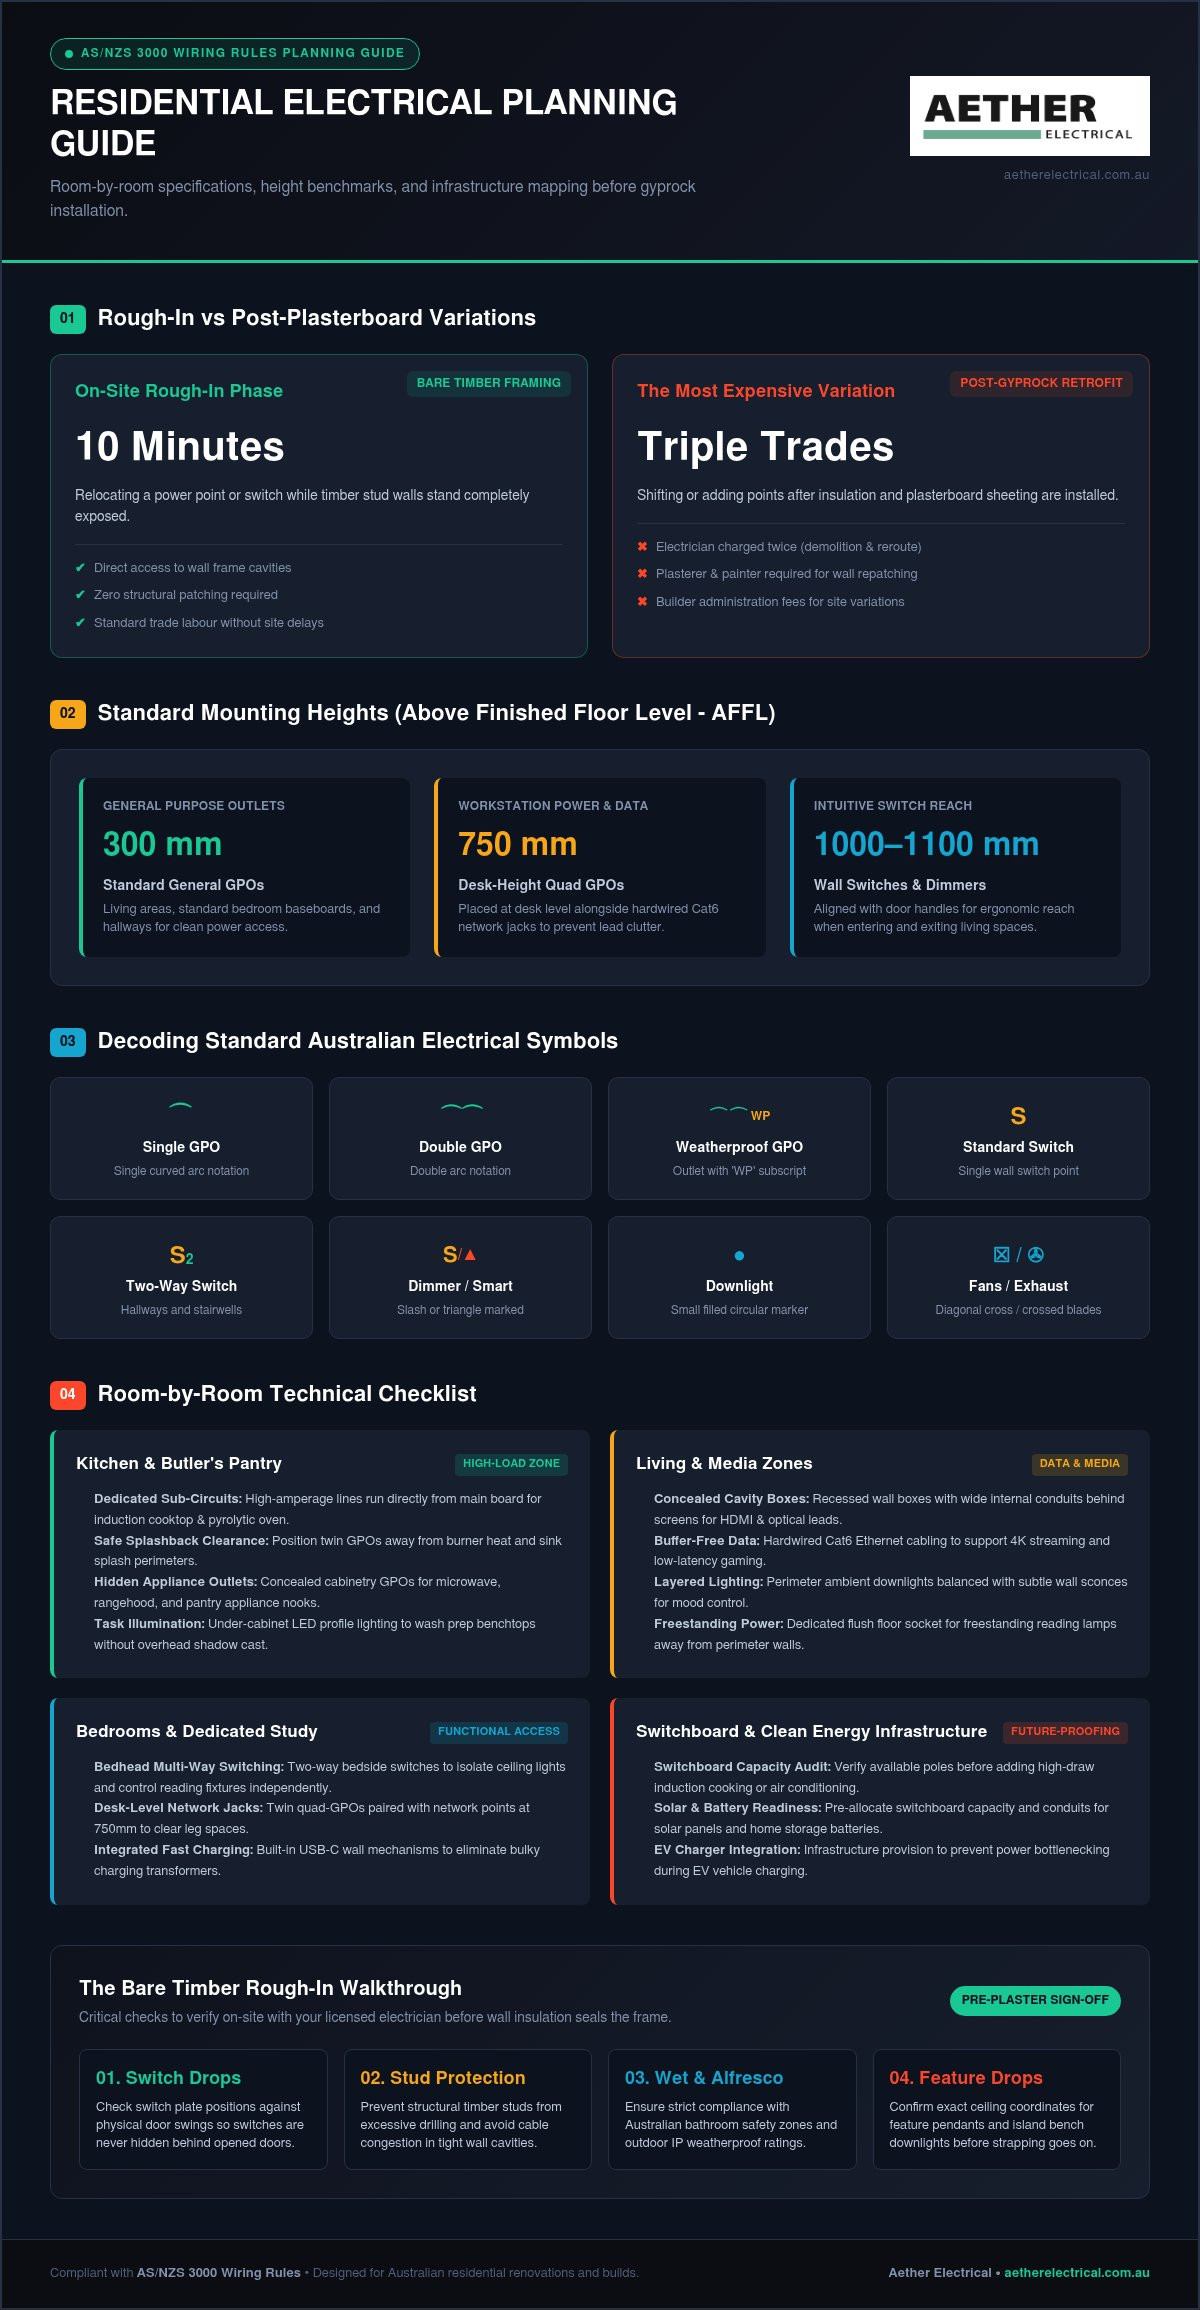
- Power Outlets (GPOs): A single curved arc represents a standard single GPO. A double arc denotes a double power point, while an adjacent subscript (like 'WP') indicates a weatherproof exterior outlet.
- Wall Switches: Marked with a simple 'S'. A small subscript '2' denotes two-way switching, vital for stairwells and long hallways. Dimmer mechanisms and smart switches feature a small triangle or slash across the symbol.
- Lighting & Ventilation: Downlights appear as small filled circles. Feature pendants use hollow circles with hanging lines. Ceiling fans use crossed propeller blades, while exhaust fans are marked as squares with internal diagonal crosses.
The Financial Risk of Skipping a Detailed Electrical Layout
Shifting a power point takes ten minutes while the timber stud walls stand bare. Once insulation and gyprock go up, that simple tweak becomes a major financial headache. Every post-plasterboard change requires cutting into finished lining, pulling new cables through tight structural cavities, and re-patching sheeting. You pay for the electrician's time twice, alongside the plasterer and painter.
Builders also charge administrative fees to manage unexpected site variations. Detailed layouts prevent cable congestion in narrow wall cavities, protect your structural studs from excessive drilling, and lock in your project budget before the rough-in stage begins.
Room-by-Room Electrical Plan Checklist: Core Indoor Living Spaces
Every functional indoor space relies on proper fixture positioning and circuit sizing. A practical electrical plan details exact heights above finished floor level (AFFL). Standard general power outlets sit comfortably at 300mm AFFL, while wall switches sit between 1000mm and 1100mm for intuitive reach. Adding integrated fast-charge USB-C wall mechanisms eliminates messy adaptors and keeps everyday charging uncluttered.
Kitchen and Butler Pantry Electrical Layout Checklist
Modern kitchens demand heavy power. Induction cooktops and pyrolytic ovens require dedicated, high-amperage sub-circuits run straight from the main board. Keep splashback twin power points positioned safely away from cooktop burners and sink splash perimeters. Tuck dedicated outlets inside cabinetry for built-in microwaves, rangehoods, and hidden appliance nooks. Under-cabinet LED profile lighting washes prep surfaces evenly, banishing shadows cast by overhead downlights.
Living Room and Media Zone Wiring Specifications
Entertainment zones need clean lines without dangling leads. Installing recessed wall boxes with wide internal conduits behind wall-hung screens conceals HDMI and optical cables cleanly. While wireless connections handle light browsing, hardwired Cat6 data cabling ensures buffer-free 4K streaming and low-latency gaming. Layer your illumination by pairing perimeter ambient downlights with subtle wall sconces, plus a dedicated floor socket for freestanding reading lamps.
Bedrooms and Dedicated Home Office Power Requirements
Bedrooms function best with multi-way switching. Two-way switches placed at bedhead height let you switch off ceiling lights without leaving bed, while operating reading lights independently. For remote workstations, place twin quad-GPOs at 750mm desk height alongside hardwired network jacks to maintain clean cord management. Don't forget an internal power point inside the master wardrobe to keep your stick vacuum charged and out of sight.
Planning these functional touches early creates a seamless everyday living experience. If you are refining your renovation drawings, getting your plans reviewed by the team at Aether Electrical ensures your indoor wiring is ergonomic, compliant, and tailored to how you actually live.
Wet Areas, Alfresco, and Outdoor Electrical Planning Checklist
Outdoor entertaining and wet zones demand strict attention to environmental exposure. In subtropical climates across Queensland and Northern New South Wales, moisture, driving rain, and salt air quickly compromise poorly placed fittings. A compliant electrical plan prevents dangerous faults by respecting statutory safety boundaries, specifying robust Ingress Protection (IP) ratings, and incorporating sealed, draft-stopping exhaust fans to stop mould before it starts.
Bathroom, Ensuite, and Laundry Safety Zones
Australian standard AS/NZS 3000 defines four specific moisture zones around baths, basins, and open showers:
- Zone 0 & Zone 1: The interior of the shower base and bath basin. Standard 240V switches and GPOs are strictly prohibited here. Only low-voltage, water-rated luminaires belong in these areas.
- Zone 2 & Zone 3: The immediate splash perimeter extending outwards from water edges. General power points must sit outside these exclusion boundaries.
- Grooming Storage: Recessed shaving cabinets provide an ideal location for internal power points, keeping toothbrushes and shavers charging dryly out of sight.
- Dedicated Wet Circuits: Run independent lines for high-velocity exhaust units, hardwired heated towel rails, and under-tile heating mats to avoid nuisance trips.
Alfresco Dining, Patios, and Outdoor Kitchens
Covered verandas and external cooking zones require commercial-grade protection. Standard interior fittings degrade rapidly when exposed to coastal humidity. Specify weatherproof IP56-rated double GPOs with spring-loaded covers around built-in barbecues, bar fridges, and outdoor prep benches. For summer cooling, center high-output, rust-resistant ceiling fans over seating areas rather than walkways. Add low-voltage garden spike lights and recessed deck tread illumination to make paths safe without creating harsh glare.
Pool Areas and External Perimeter Security Lighting
Pool installations carry unique life-safety mandates. Current standards require equipotential bonding, connecting all conductive metal elements within reach of the water directly to the main earthing system. Pool filtration systems, chlorinators, and heat pumps require dedicated, weather-protected sub-circuits with independent residual current devices (RCDs). Along dark property boundaries, install dual-head motion-sensor LED floodlights above driveways and side paths to deter intruders without disturbing indoor bedrooms.
Switchboards and Future-Proofing: Solar, Batteries, and EV Infrastructure
Your switchboard acts as the central engine of your home. Adding modern induction cooktops, powerful multi-head air conditioners, or pool heating without assessing this hub creates an immediate bottleneck. An effective electrical plan audits your total incoming mains capacity before renovation work starts, preventing tripped breakers and expensive emergency service upgrades later.
Auditing Your Switchboard Capacity and Safety Switches
Older homes across Southeast Queensland and Northern New South Wales often still rely on dated enclosures. Upgrading to modern safety switches brings immediate protection:
- RCBO Protection: Replace obsolete ceramic rewirable fuses with individual Residual Current Breakers with Overcurrent protection (RCBOs) that cut power instantly during a fault.
- Phasing Requirements: Evaluate whether your property needs a shift from single-phase to three-phase power. Large ducted air conditioning, rapid vehicle chargers, and instant electric hot water frequently demand that extra supply buffer.
- Spare Enclosure Capacity: Ensure your new switchboard includes at least 20% to 30% empty pole space. Leaving spare DIN rail room guarantees you won't need a second sub-board when adding future hardware.
Laying the Groundwork for Solar and Home Battery Storage
Renovating offers the cleanest opportunity to prepare for domestic renewable generation. Allocate dedicated garage or exterior wall space early for your hybrid inverter and battery storage unit, keeping required clearances away from direct afternoon sun. Running heavy-gauge solar conduits through the roof cavity down to the switchboard before ceiling battens go up prevents visible external pipework across your finished cladding. Factoring in a smart energy consumption meter gives you real-time visibility over household power draws and solar export limits.
Dedicated Circuits for Fast Electric Vehicle (EV) Charging
Relying on a standard 10A socket for an electric vehicle takes days to recharge a depleted battery. A dedicated Level 2 wallbox requires an independent 32A single-phase or three-phase sub-circuit. Installing heavy-duty cabling through open stud walls directly into the garage eliminates the hassle of tearing through finished plasterboard or trenching under driveways later.
Planning these high-draw assets early saves thousands compared to retrofitting finished rooms. To protect your investment and prepare your home for next-generation electrification, book an upfront layout consultation with Aether Electrical to audit your switchboard capacity today.
Working with Your Electrician: The Rough-In Walkthrough and Sign-Off
The rough-in occurs immediately after timber framing stands complete and right before insulation or gyprock goes up. This window gives you one clear opportunity to walk the bare frame with your licensed electrician. Walking the site transforms your paper electrical plan into physical wall boxes and cable runs, catching layout clashes before they turn into costly variations.
The Pre-Rough-In On-Site Frame Walkthrough
Walk room by room with chalk or a marker in hand. Mark stud faces alongside your trade specialist to lock in exact plate elevations. Keep these practical physical checks in mind:
- Door Clearance: Verify door hinge directions to ensure swinging doors do not conceal primary light switches.
- Plumbing Alignment: Confirm under-sink plumbing pipes and waste drains do not block dedicated power points for dishwashers or waste disposers.
- Finished Material Depths: Account for floor screed, thick bathroom tiles, and splashback stone so faceplates sit flush rather than recessed.
Communicating Custom Joinery and Lighting Details
Custom cabinetry requires tight trade coordination. Share your cabinetmaker's finalized shop drawings so your electrician knows where to route concealed wiring for routed LED profile channels. Check island bench framing for pop-up power points, confirming that stone waterfall ends leave adequate cavity clearance for wiring boxes. Look upward at your ceiling joists, too. If structural timbers conflict with symmetrical feature pendant drops over your island or dining table, your carpenter must install blocking noggins before cabling starts.
Final Testing, As-Built Documentation, and Certification
Once final fit-off finishes and power goes live, verification begins. Request marked-up as-built plans showing exact hidden conduit paths, giving you a clear reference before mounting wall art or heavy mirrors. Your electrician must complete mandatory testing across every RCBO safety switch to confirm instantaneous trip times under fault conditions.
Never consider a job complete without receiving a formal electrical Certificate of Compliance. This legal document certifies that every circuit adheres strictly to AS/NZS 3000 rules, safeguarding your manufacturer warranties and home insurance policy. For clean craftsmanship and seamless trade coordination on your upcoming renovation, connect with Aether Electrical to bring your electrical plan to life.
Build with Confidence: Lock In Your Layout Today
Upfront planning transforms construction stress into clear, simple decisions. Locking in your electrical plan before plasterboard goes up protects your renovation budget, ensures effortless daily convenience, and prepares your switchboard for future energy demands. Walking the bare framing with a qualified trade specialist means no regrets, no messy wall patch repairs, and zero compromise on safety.
Aether Electrical delivers clean craftsmanship and practical trade advice across the Gold Coast and Northern Rivers. Fully licensed and insured, our team provides comprehensive capabilities across general domestic wiring, architectural lighting, switchboard upgrades, solar, battery storage, and EV charging. Every installation is backed by guaranteed compliance with AS/NZS 3000 Australian Wiring Rules.
Take the friction out of your renovation journey. Book an electrical plan review with Aether Electrical to create a home that supports your daily lifestyle today and easily powers tomorrow.
Frequently Asked Questions
What is included in a standard home electrical plan?
A standard electrical plan maps every general power outlet, light fitting, wall switch, and hardwired appliance across your architectural floor schematic. It details exact mounting elevations, dedicated circuit pathways, switchboard capacities, and external weatherproof fixtures. Crucially, it also schedules safety switch protections, smoke alarm positions, and future infrastructure conduits for solar arrays, home batteries, and EV chargers to comply with AS/NZS 3000 rules.
Can I draw my own electrical plan for an Australian home renovation?
You can draft your own initial furniture and outlet wish list, but you cannot produce the final compliance document. Australian law requires all fixed electrical work to satisfy strict AS/NZS 3000 wiring standards. A licensed electrician must translate your concept sketches into a trade-compliant electrical plan, verifying circuit loads, wet area boundary zones, and cable derating before timber rough-in kicks off.
When is the best time to finalise an electrical layout with a builder?
Lock in your layout well before structural framing begins. The best milestone is during the pre-construction drafting phase, before builder procurement orders and approvals close. This timing allows your electrician to coordinate directly with carpenters and plumbers. Any minor adjustments can then be walked through and confirmed on site during the rough-in stage right before wall insulation and gyprock go up.
How much does it cost to change a power point location after plastering?
Relocating a point after gyprock installation costs significantly more than during bare framing. While we don't quote fixed figures sight unseen, the expense multiplies because three trades get involved. Your electrician must cut access holes and fish new wiring, the plasterer must patch and sand the sheets, and the painter must re-coat the wall. Builders also add administrative variation fees to process the revision.
What is the difference between single-phase and three-phase power on a plan?
Single-phase supply delivers 230 volts via one active wire, suitable for modest homes with standard electrical appliances. Three-phase delivers 400 volts across three separate active conductors, tripling incoming capacity. If your renovation plans include ducted reverse-cycle air conditioning, a large induction cooktop, rapid EV wallbox charging, or substantial solar and battery storage, upgrading to three-phase power prevents overloaded switchboard circuits.
Are interconnected smoke alarms legally required on a renovation electrical plan?
Yes. In Queensland and New South Wales, strict residential fire safety legislation mandates interconnected photoelectric smoke alarms. Every bedroom, adjoining hallway, and storey requires an alarm powered by mains or non-removable 10-year lithium batteries. When one triggers, all alarms sound simultaneously. Integrating these units into your early renovation drawings ensures hardwired interconnectivity and full compliance certification upon sign-off.
How many power points should I include per room on average?
Aim for at least three to four double GPOs in bedrooms, placing pairs beside bedheads and near study desks. Kitchens typically require four to six double outlets across prep splashbacks, plus dedicated feeds for under-cabinet appliances. Living rooms benefit from five or more double points to manage media consoles, reading lamps, and mobile charging without relying on hazardous floor power boards.

